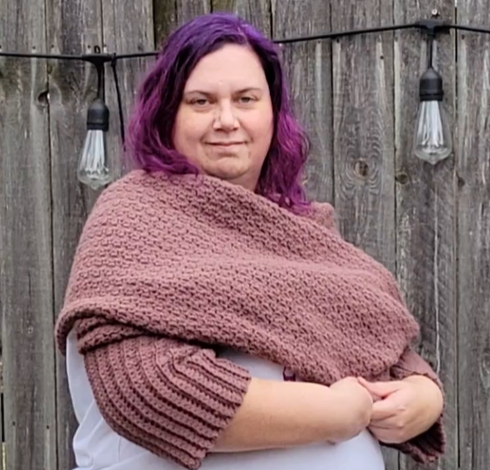
“Great minds think alike.” I can still hear my late grandmother’s voice saying this whenever two or more people seemed to have a similar or same thought at the same time. Whether it was a dinner idea, or something to pass so time, or another idea, it was what we heard.
Last fall, as the leaves started changing even though our temperatures hadn’t dropped, I had been scrolling Pinterest in search of some new inspiration. I found a couple patterns of wraps with sleeves, took a few notes, and then promptly picked up an amigurumi doll I was working on.
Not even a week later, I had one of my Besties on the phone. She tells me she had seen this scarf with sleeves. She wondered if I had ever seen anything like it before and if I could make one for her. I chuckled a little and told her she wouldn’t believe it, but I had just had an idea for the same thing that I had on a near burner. I told her I would be starting to work of the logistics of my idea and I would keep her posted.
I couple days later, after I finished that doll, I grabbed a pen and notebook (I’m still a little old-school when it comes to creating), a skein of yarn, and my box of crochet hooks.
I already knew what stitch patterns I wanted to use to create this piece. I’ve never been a huge fan of front or back post double crochet for ribbing. It never seems to cinch well enough, seems overly bulky, and the feel of the texture kinda gives me the “yuck”. This means I went for the single crochet ribbing option for the sleeves. That was easy to transition into to griddle stitch that I wanted so badly to use for this pattern. It gives an elegant look that is amazingly easy to achieve for someone who is new to crochet.
I wanted the piece to be gauged so it didn’t have huge gaps, but I also knew that I wanted something that wasn’t too stiff, was warm, but wasn’t something that I would get too hot in. I set forth with the gauge swatching. As long as the griddle stitch of the main part was what I wanted, I knew from experience that the single crochet ribbing would be fine. Because of the ribbing, I decided to make my take on the sweater scarf lengthwise. While testing this I decided on a size K/6.5 mm hook.
By the time I went to bed that night, I had already done all the math for three sizes. I continued working my first sweater scarf in my size over the next couple days. As soon as I hid tails on it, I couldn’t wait to it on. I loved it. Just enough warmth to make you cozy, but not enough to make me turn into a sweaty mess.
I started on a sweater pattern (coming soon) and had sizing worked out to 5XL. This got me to thinking that my sweater scarf needed a fourth size to be more size inclusive. I got doing the math and began doing the tests to measure how much yarn was needed.
A few weeks later, I got together with my Bestie so she could try it. By now the snow was lightly flying and there was a bit of a chill in the air. She, too, loved it. I came home and started on hers in the color she requested.
Now on to the pattern.

MELODY CROCHET SWEATER SCARF
Materials:
Worsted Weight Yarn 791 (1161, 1505, 1850) yards. Lion Brand Pound of Love pictured
Size K hook or size needed to obtain gauge
Stitch markers
yarn needle
Gauge
12 sts x 11 rows = 4 in griddle stitch
Sizing size bust
| XS -S | 32-34 |
| M-L | 35-42 |
| XL – 2XL | 43-48 |
| 3XL – 5XL | 49-62 |
Notes
*The instructions are written as XS/S (M/L, XL/2XL, 3/5XL). When only one number is given, it applies to all sizes.
*Place one stitch marker (sm) in the 35th ch made.
slim tutorial video: https://youtu.be/wh9KIPzNiRY
Abbreviations:
ch – chain, sc – single crochet, sm – stitch marker, dc – double crochet, blo – back loop only, sl st – slip stitch
Ch 240 (262, 288, 332) leaving a long enough tail to seam sleeve
Row 1 (WS): Sc in 2nd ch from hook and in each of next 34 chs, place sm, (dc, sc) across to sm, dc in st before sm, sc in each of remaining 35 sc, ch 1, turn.
Row 2 (RS): blo sc 35, (sc, dc) across to sm, sc in st before sm, blo sc in remaining 35 sts, ch 1, turn.
Row 3: blo sc 35, (dc, sc) across to sm, dc in st before sm, blo sc in remaining 35 sts, ch 1, turn.
Repeat rows 2 and 3 until piece measures 12.5” (15.5”, 17.5”, 22”) from beginning row when measured across the body. End on a RS row. Do not finish off.
Fold lengthwise, sl st along the 35 sts of ribbing through blo of first and last rows to make sleeve. Finish off and weave in end. Repeat on other section of ribbing.
Enjoy your new sweater scarf!
